Stabilizer for a Canon G15 camera
Updated 26 May 2018
Introduction
I started using a Super-8 movie camera in 1968 and I have just recently converted the films to a video format. The last film dated from 1982 and I have not filmed or videoed since. During the transfer of the films, using a Canon G11 camera in video mode, I thought it might be worthwhile taking some videos of our cycling trips and other activities. My first video was very shaky and unwatchable. A tripod was an obvious solution but movement with the subject was limited. As a result I started to research various camera stabilizers. Many devices were able to hold a camera level, while moving, but it was not so easy to pan or tilt the camera. Balancing also took a long time.
Building a stabilizer
I came across a $14 Camera Stabilizer while browsing the Internet. It used standard metal plumbing fittings in the build. A side arm was included to help with camera positioning. I built this unit and my short videos improved. My next thought was how could I simplify and reduce the size of the device for use with a small camera such as a Canon G15. I also found the SteadyTracker which had a similar geometry without a side arm. Instead the hand support was a rubberised disk and a metal flange. Using a light grip, very good results could be obtained.
A stabilizer for the Canon G15 camera
In my case I simply wanted a stabilizer that worked with the Canon G15 video mode. The components of the stabilizer are shown at right. This is about as simple as I can make the design.
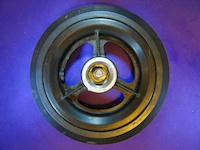
At the top a 1/4 inch bolt was used to fit to the tripod socket of the camera. Next a locking nut (or an inverted wing nut) was used to tighten onto the camera. I added an optional threaded offset plate, described below and shown at right, for camera balance. The 1/4 inch bolt fitted through a hole drilled in the centre of the end cap. The end cap screwed onto the end of a 21.5mm diameter, 300mm long, threaded pipe. At the other end another drilled end cap was fitted to a 195g 120mm diameter scooter wheel. The end cap was machined down until circular and the end was faced off. I also machined the plastic wheel bearing so it would fit the now circular end cap.
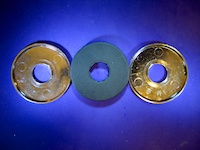
Two plastic shower wall flanges and a foam rubber disk were fitted onto the pipe The rubber I used was relatively firm. Below this is I fitted a 130mm long bike hand-grip. The position was held stable, just above the balance point, with a moveable spring made from a suitable diameter key ring. Parts purchase, a small amount of machining, drilling and assembly took only part of an afternoon.
Holding the grip lightly with the flange resting on the hand produces stable videos. The other hand is free to adjust the camera controls.
The video results are at least as good as those from my previous build. They are certainly watchable. The total weight of the stabilizer, including the camera, is 1.1kg.
This camera stabilizer can also be used as a short monopod camera support.
Modifications
The base could be made out of wood, rectangular aluminium or steel sheet, or out of extruded aluminium channel. There may be a benefit in separating the weight of the base into two parts. This increases the inertia against axial rotation. For the existing geometry the base should have a similar weight to the camera. A suitable wheel can be used as it has the advantage that most of the mass is at the perimeter for improved axial stability. Other options include the use of aluminium or plastic tubing for the stem. Powder coating the aluminium parts would produce a durable finish.
More work needs to be done on the choice of rubber inside the flange. It should not collapse, but it should have some flexibility. The flange assembly could be replaced by a gimbal to allow even more isolation from hand movement. Alternatively a rubber or metal membrane could be added inside a modified flange for two axis isolation. A moulded rubber assembly, with more flexibility near the core, would be ideal.
For perfect axial balance of the G15 a small fixed plate is added which offsets the camera tripod mount. This new mount should be located 9mm further away from the battery compartment and 5mm towards to the front of the camera. This is essentially a shift of 10mm radially. The Canon G11 requires the same offset. The plate is shown at upper right.
A 1.25kg barbell weight can be used for heavier cameras. In this case an adjustable camera centring plate will be needed for axial balance.
Low cost camera stabilizer.
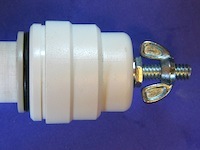
I made a second low cost stabilizer. It also used a 195g 120mm diameter scooter wheel as a base. For the stem a 400mm long 21.5mm diameter white plastic pressure tube was used with matching Speedfit end-caps. Again a 1/4 inch bolt was used at the top end-cap with an inverted wing nut to lock the camera in place. A 6mm bolt was used at the other end to to hold the wheel onto the other end-cap. This bolt was used with a 14mm washer and the wheel was partially drilled out so that the end cap could be recessed. Again I used two shower wall flanges with a foam rubber ring in between. The flanges were each glued to the foam rubber ring. An O-ring stop just above the balance point completed the design. The O-ring was much more secure than expected. I also added an O-ring to each end cap to lock the quick-release rings.
This time the balance point was significantly higher. The total weight with the camera was less at 700g. Assembly time was less than two hours.
Revised flange assembly
I have now mounted the flange assembly over the upper part of a rubber hand grip. I machined out the holes in the flanges to suit. The top flange hole was machined to a diameter of 32mm while the hole in the bottom flange was machined out to a diameter of 30mm. The foam rubber has been replaced with a ring of open cell foam plastic. In my case, I used an aquarium filter. The bottom flange was held in place with an O-ring. The foam plastic and the flexibility of the rubber grip supporting the flange allows the flange assembly to absorb considerable hand movement. I have since modified my original version as well. Both are shown in the picture above-left.
The stability obtained depends as much on the skill of the user as on the device itself. It is simply an aid.

JEPSPECTRO - Home Page
Email: replace at with @
jepattersonatactrix.co.nz
$14 Camera Stabilizer
THE PICOSTEADY - Video Camera Stabilizer
SteadyTracker
Click the photos below to enlarge. Use the browser "back control" to return.
 Steel end cap with 1/4 inch bolt and camera offset plate
 Hand support. Shower wall flanges and a foam-rubber ring
 Bike hand grip and hand support
 120mm scooter wheel base
 Speedfit end cap and 1/4 inch bolt