SmartMotion Vista Folding Electric Bike
Updated 22 November 2023
Contents
Use the browser "back control" to return here.
- Introduction
- Details, Battery, Battery Problem, Performance, Display, Gearing, Tyres, Seat, Mirror, Lock, Weights, Front fork and Rims
- Additions
- Loading the Bike Into a Car
- New Owner
- Electric Dutch Bikes
- Conclusion
Introduction
The folding SmartMotion Vista and the low-step SmartMotion Essence were two entry level bikes with a similar specification and price. The Vista frame and wheel sizes were the same as the SmartMotion e20. A 250 watt motor was fitted in the front wheel and there was a 3-speed Shimano Nexus internal hub gear in the rear. This bike may be better balanced and simpler to maintain, for some users, when compared with the SmartMotion e20.
Note that these bikes are no longer part of SmartMotion's current range. The e20 is a good replacement for the Vista.
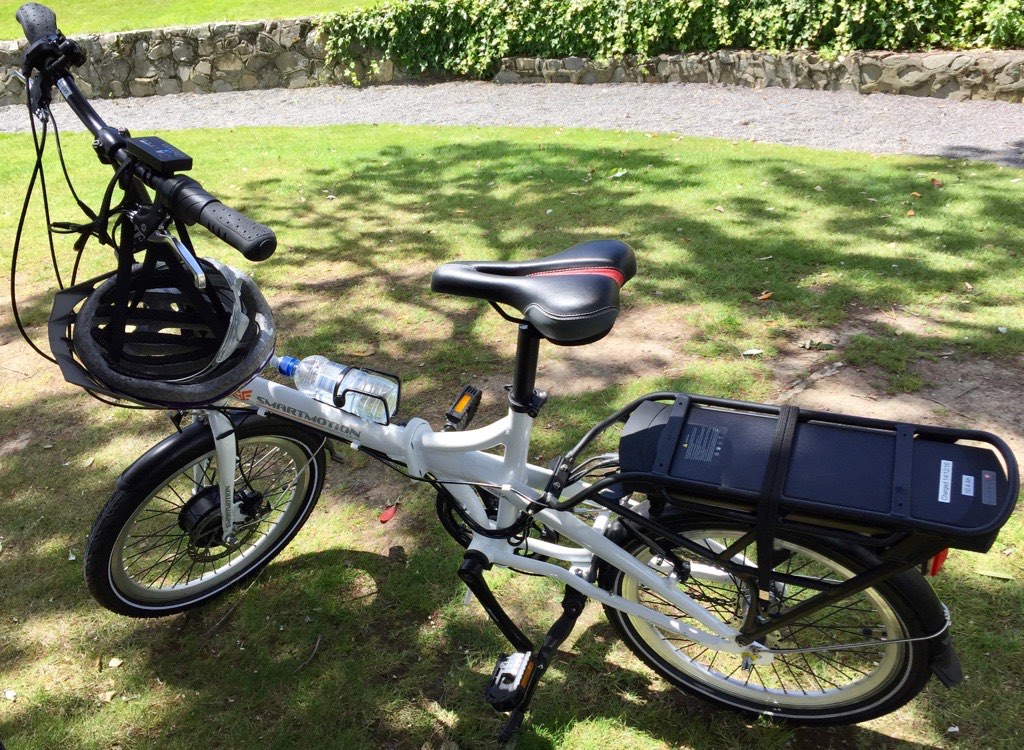
Details
Battery
A 36 volt 10.4 Amp Hour battery is provided. I would suggest for our style of riding, an optional 15.6 Amp Hour battery should be fitted for the following reasons:
- The range is greater which suits the 50 km rides we currently do, since our fitness and endurance has improved.
- The total peak current that can be supplied is greater but the current supplied per cell is usually less. This should improve the battery life and reduce battery heating.
- The internal resistance of the larger battery is lower so the voltage output should be more stable under load.
- Our city has many hills and it is also sometimes very windy. Starting off on the bike draws a high current from the battery, which could cause the voltage to sag below the battery cut-off.
- For flat riding along waterfront and on river trails the lower capacity battery is fine - but under those conditions a non-electric bike may also be sufficient for many riders.
- The standard battery has 2/3rds the capacity, but the total lifetime user value is about half that of the 15.6 Amp-Hour battery.
Battery Problem
There has been a persistent problem with the 10.3 Ah battery in normal use where it suddenly cuts out. This is hopefully being resolved with a warranty claim. The battery issue turned out to be an over-voltage problem with the battery. Since the charger open-circuit voltage is 41.7 volts the source of the problem is likely to be from the Battery Management System (BMS). Cell voltages are balanced by shifting charge gradually from cells with higher voltages to cells with lower voltages. This improves the total capacity of the battery.
Cell balancing takes electronic charge from a fully charged cell using a capacitor. The capacitor is connected to cells with lower voltages and charge is transferred. This process is rapidly repeated and is controlled by a microprocessor with an analog to digital converter for each cell. Field effect transistors (FETs) are used as switches to make the appropriate connections.
If there are electronic faults, wiring errors, or programming errors, then the balancing voltage on the capacitor might be too high and an over-voltage fault is the result. One shorted or unswitched FET would cause the capacitor to charge to a voltage higher than 8 volts because there can now be a connection across more than one cell. This repeated application of this charge to a neighbouring battery cell would eventually cause a serious over-voltage situation to develop, which should cause protection circuits to trip.
If the bike is immediately ridden, after charging the battery, this fault may not be apparent. If the battery is charged after riding and left until the next ride, the fault may be present as more time has elapsed to allow the over-voltage to build up. Sometime later the battery may be useable but liable to cutting out as the internal temperature rises during use. Battery balancing occurs during the late stage of charging and after the charging has finished. The electronic circuit to do this is inside the battery housing.
An alternative method of battery management is to monitor the voltage of each cell during charging. The cells which are ahead in voltage compared with weakest cell have a resistive load applied to them with the help of a FET switch. This ensures that all cells reach the same voltage as the charger output at the same time. It is hard to create an over-voltage situation in this case. This method works best with full charge cycles.
Unfortunately the replacement battery showed similar over-voltage symptoms after charging, so we may be looking at a wider problem with a batch of 10.3 Ah batteries. The discussion above explains the facts, but it may be wrong, as we are dealing with a very complex system. For example, a wiring error could mean that the battery is trying to balance against two cells in series at 8 volts which eventually trips the protection circuit. The last battery returned managed to reach 54 volts, during post-charge balancing, because of this type of error. I tend to suspect a wiring error which has affected one sequential batch of batteries.
The bike now has a new 15.6 Ah 36 volt battery. All is now stable and working properly thanks to the support of Cliff Randall and the staff at Wellington Electric Bikes.
Performance
I have now ridden this bike and my comments for the SmartMotion eMetro Electric Bike, apply to this bike. I found that riding at 20% to 40% power was plenty for me. Hills and a strong wind were not a problem. The available power is similar to my SmartMotion e20. The acceleration is a little more sudden than my SmartMotion e20, so inexperienced riders should start with the lower assist levels and with the throttle temporarily disconnected. The battery range should be very good with the 20% to 40% settings.
A little vibration may be felt through the hand grips when the motor is heavily loaded and running slow. As a more ideal and efficient operating speed is reached the vibration felt will be greatly reduced. The motor should also be much quieter. For all electric bikes minimum noise and vibration correlates with less motor wear and more range from the battery.
The motor is not too powerful. It is designed to assist on hills and into strong winds. Excess power in front wheel driven bikes can be dangerous as front tyre adhesion can be suddenly lost on gravel, mud or leaves. As long as the motor is there to assist, rather than dominate the ride, there should be no problems. Disconnecting or removing the throttle is sometimes recommended, depending on the confidence and experience of the rider. In some ways I regard the throttle as just one more distraction. While the throttle can help with getting started quickly at intersections, with hub gears it is just as easy to change to a lower gear while stationary.
Display
The LED display is shown at upper right. It is functional and simple. One simplification that is perhaps not so desirable is that the assist levels can only be set in an increasing fashion 1-2-3-4-5, and then back to 1. For beginners this makes the bike more difficult to control, as you have to go up through the high assist settings to get to a low assist setting. The solution is to simply stop pedalling, since you are likely to be in a situation where you can easily do this. The lower assist level can be easily set with a few more button presses, since the motor is now off. Turning the controller off, then on, would achieve the same thing.
An LCD display with +/- settings would be a nice upgrade, as it is also a bike computer. Speed, trip distances and other statistics will now be available.
Gearing
The gearing was ideal with 3 wide-range gears, each equivalent to 2 steps on a derailleur. A simple 3-speed Shimano Revoshift gear shifter made for easy gear changes. I used 1 for steeper hills, 2 for gentler hills or head winds, and 3 for flat riding. Electric powered bikes can be ridden using fewer gears than usual. On my SmartMotion e20 I tend to use similar gear settings for most of my riding around Wellington which is hilly and sometimes windy.
The following data may be of interest, but mostly it confirms it is a well thought out bike. The gear ratios for gears settings 1,2 and 3 are 0.733, 1 and 1.364 respectively. The step size between gears is 36.4%. The front sprocket has 52 teeth and the rear has 20 teeth. The wheel diameter is 510 mm. The crank length is 170 mm.
Gear Inches are 38.27, 52.20 and 71.21. Metres Development are 3.05, 4.15 and 5.68. Gain Ratios are 2.86, 3.90 and 5.32. These terms are defined in Sheldon Brown's article about Gain Ratios. Adjustment of the hub is easy, Set the shifter to 2 and rotate the cable adjuster near the hub until the mark is between the yellow lines. Information on the Shimano 3 speed hub adjustment and maintainence is readily available on the internet as is further information on chain and sprocket adjustments for smooth running.
Tyres
Kenda, Kevlar-guard, 20 X 1.95 inch tyres are fitted. These have a strong kevlar band under the tread, which resists punctures. My suggested tyre pressures are 20 to 30 PSI in the front and 30 to 50 PSI in the rear. Adjust for comfort with a margin to allow for slow tyre deflation over time. This assumes that the riding position is fairly upright and the riding style is slow, with reduced loading on the front wheel. With a more streamlined riding syle the front tyre pressure could be increased slightly, but for good road grip the pressure should not be too high. When riding on gravel use lower tyre pressures, otherwise the bike may be difficult to handle. It helps to have a pump with a built-in gauge although, with experience, testing a tyre by pinching it is usually just as good. Useful information on tyre pressures is at Sheldon Brown's website and at Off The Beaten Path.
Seat
A Velo-Plush seat is specified but a narrower, and possibly better, comfort seat is provided. There is no suspension seat post. It should not be needed for routine use, if the seat is good
Mirror
Since many users may be car drivers, I would suggest that a rear vision mirror be added to the end of the right handlebar. In addition to seeing cars and trucks behind, other cyclists can also be seen, which avoids any surprises.
Lock
Although an integrated frame C-lock, or Café-lock is specified for the SmartMotion Vista, it is not pictured in the brochure, nor is it supplied with current SmartMotion Vista models. Considering the type of user likely to use this bike, this is an unfortunate oversight. Mounting points are provided, so a Café-lock can be easily fitted. For me, an Café-lock is a major selling point. Two cuts are required to defeat this lock. A high quality Café-lock can be obtained The Urban Cyclist and Dutch Bike Bits. A plug-in cable can be added so the bike can be secured to nearby objects.
Weights
The bike weighs 19 kg and the 10.4 ah lithium battery weighs about 3 kg, making for a total weight of 22 kg. This is slightly lighter than our 24.5 kg e20s. The Vista with the 15.6 Ah battery weighs 23.3 kg.
Front fork and rims
The front fork is now made from Chrome-molybdenum steel. Extra strength is advisable to counter the forces from the front disc brake and, to a lesser extent, the electric motor. The rims are double walled, with a strong parabolic profile.
Some other items of interest are shown above, at right.
Additions
I added a CatEye mirror to the right handlebar. This addition is probably the most important as it contributes to safety. You can see the line that traffic is taking behind you, whether any indicators are flashing, and the approach of other cyclists. I have used a bar-end mirror on my mountain bike since the late 1980s. When riding on busy roads it helped me assess the space that wide vehicles, such as trucks, would leave me. I filed some plastic off the inside of the end-cap so the mirror tilted out further. This prevented it being knocked by my hand, during rides.
I also installed a Phillips handlebar bag. It is a removable bag which allows the bike to fold properly. These items are widely available in New Zealand.
Loading the Bike Into a Car
The bike weighs 23.3 kg. The seat and the battery can be removed. Take care not to drop the battery. The bike will now weigh about 18 kg, which may be a more manageable lift. The folded bike can be stabilised with a strap or bungee cord which runs from the handlebar, over the carrier, to the far side. This means the bike can be lifted without it unfolding. The bike can be lifted over the lip of the boot with the wheels on the left. The top of the folded bike is pushed forward so it lies down on its handlebar. The bike is secured by a strap which runs from one side of the car, through the bike frame, to the other side using the rear seat latching points. It may not be such a good idea to rest the bike, the other way up, on its hub-gear adjustor.
To unload the bike reach over to hold the top of the seat tube and pull back to raise the bike upright. Lift the bike over boot lip. Unfold the bike. Insert the seat and the battery.
With two bikes they can be placed upright, in the back - one each side, sufficiently far forward so the carrier does not touch the rear window. Bungee cords secured to the headrest stays, along with straps to the rear seat latching points will help. A single bike can also be stored this way. There may be additional loading difficulties with some cars. It helps to have a level surface right to the back. Plastic boxes with sturdy lids can be used as fillers to make things level, as well as well as providing useful additional storage.
Removing just the seat may make storage easier in some cars. My preference would be not to remove the battery as a regular exercise.
New Owner
My cousin Jenny, in Nelson, is the new owner of this bike. Aimée had the problems with the battery, since fixed, and some other issues with bike and riding stability. We have experimented with tyre pressures and the advice above to use lower tyre pressures will ensure a stable ride. The front stem clamp has been lubricated with grease and it now functions reliably. As the engaging surfaces smooth off with use, the clamp should also function properly without any lubrication.

How did the bike get to Nelson? I took it on the Interislander ferry and rode it 35 km to Havelock where I met up with Jenny. I was able to test the 3 hub-gear levels and all 5 assist levels. On the flat I estimated my speed was around 25 - 35 km/h and on the hills it dropped as low as 10 km/h. I stopped for photos along the way. My time for the 35 km ride was 1 hour 50 minutes on a very hot day into a strong head wind. I spent some time setting up the bike in Nelson for Jenny and then we went for a test ride which included some steep hills. The bike has behaved itself and hopefully it will be useful.

Electric Dutch Bikes
I am gradually working out the ideal bike for the inexperienced older rider in Wellington. Step-through or low-step is important as it is not always easy to lift the leg over a carrier with a battery included. With electric assistance the gearing can be simplified, so a hub gear would be ideal. A protected chain would mean that the chain life is extended. A built-in café lock is important. We use ours all the time - at cafés.
The battery need not be very large as the bike would normally be ridden at around 15 to 20 kilometres per hour for a 30 - 60 km range, with some effort by the rider. A front hub mounted electric motor is simple and requires few changes to the bike design, as long as the motor power is around 250 watts. A hub motor extends the chain life as it drives the wheel directly, which reduces the chain tension.
These design ideas are a blend of the classic Dutch bike with a simple electric drive. All weather performance, minimum maintenance and simple adjustments are basic requirements. The only low priced bikes in the SmartMotion range are now the long established SmartMotion e20 folding bike at $2749 and the eCity low-step bike at $2999. There are no bikes with hub gears. Faraday make very nice electric bikes which were retailed in New Zealand by Bicycle Junction in Wellington.
I am very impressed with the 2019 Giant LaFree E+ low-step electric bike. This is a mid-drive bike with wide tyres and 8 speed Altus gearing at a fair price in New Zealand of $2999. The only thing missing is lighting. These days long-life rechargeable lights can easily be added, which avoids the need for additional wiring.
Recently Lekker has started shipping Dutch style eBikes to New Zealand from Australia. The Lekker Jordaan eBike looks very nice. Gazelle bikes are sometimes offered in New Zealand.
Another good option is to upgrade an existing classic steel frame bike with a
Dillenger E-bike conversion kit
In all cases it is important to find a reliable local dealer for maintenance and to replace or upgrade parts.
Conclusion
This bike would be ideal for retired people to keep inside a car, caravan or boat and to carry on a train for exploring new areas. Weight-wise it is better balanced than other options, so it is easier to lift into place. Folding the bike need not be be complete for storage. Folding just the frame and the handlebar stem may suffice in many cases. The seat can be left up and the pedals not folded to make things simpler. Hopefully, the bike will be suitable for light touring.
A bike for normal use should be simple, comfortable and convenient. It should be noted that the SmartMotion folding bike frames are longer than normal, so the riding experience is similar to that of a full size bike. The simplicity of this bike means the ride can be enjoyed more, rather than having technicalities intruding. Apart from a mirror and a lock, nothing more needs to be added.
I have now test-ridden this bike around my hilly suburb. For me, even the steepest hills, about 14% slope, needed no more than 60% assist which would be similar to level 3 on the SmartMotion e20. As with all legal electric bikes, some assistance is required from the rider. The bike does not feel very different from the SmartMotion e20, so for general use it should be fine. In Wellington it will help both with hills and against strong winds.
I recommend double checking that the frame clamps are secured properly and that the safety tabs are engaged. Check that both brakes are working and adjusted properly and the cables are not frayed. Clean and lubricate the chain. Wipe off any excess oil as it will only collect abrasive dust and increase wear. The oil left inside the chain will work properly for a longer time. Use a little grease on the folding clamps for smooth operation. The seat and stem clamp-lever cams should also be greased. Because the motor is in the front wheel, most of the standard bike maintenance can be carried out by a competent bike shop.
The difference in weight between the lighter Vista and the heavier e20 folding bikes is almost entirely due to the lower capacity 10.3 Ah (3 kg) battery used in the Vista. With the 10.3 Ah battery, changing the suspension seat post (0.6 kg) and removing the café lock (0.4 kg) the e20 should have now a similar weight to the Vista. The current version of the e20 is also slightly lighter than mine. The distributed weight of the Vista may make lifting it slightly easier.
Thanks to Aimée McLeod for letting me test her new bike.
Go to top
JEP Links
JEP Related LinksArts & Letters Daily
BBC News - Home
Radio New Zealand News Headlines
ScienceNews
ScitechDaily
Spike.News
Universe Today
xkcd
Bike Reviews
Giant Expressway 2 Folding BikeSmartMotion e20 Folding Electric Bike
Jamis Allegro Sport Fitness Bike
SmartMotion eMetro Electric Bike
Bickerton Portable Folding Bike
Manufacturer
SmartMotion Electric BikesSelected Dealers
Wellington Electric BikesBurkes Cycles
Bicycle Junction
SwitchedOnBikes
Blogs and Links
Dizzy's Folding Bike BlogPedelecs
Electric Bike Review
Endless-sphere.com
The Prospectory
SlowCycles
Alastair's Blog
Cyclopolitan
Cycling in Wellington
Cycling And Hiking Adventures & Detours
Maintenance
Sheldon Brown ArchiveMadeGood Bike Repair
Trails and Touring
AATravel Alps2Ocean-Cycle-TrailChristchurch official visitor guide
Clutha Gold Trail
crazyguyonabike - Bicycle Touring
Mount John Observatory Tekapo
Hawke's Bay cycle trails
Hyde Otago Rail Trail Accommodation
Kennett Brothers Limited
Must-Do's: Cycling Travel Guide
Otago Central Rail Trail Official Website
Otago Rail Trail
Mackenzie Country Tekapo Canals Alps to Ocean Cycle Trail 5 day bike tour
New Zealand Cycle Trails
Ngā Haerenga - Great Rides of New Zealand
Queenstown Trails
Tasman's Great Taste Trail
Trail Hub
Trail Journeys - Otago Central Rail Trail, Roxburgh Gorge and Clutha Gold Trails
NZ Topo Map - New Zealand Topographic Map
Ultralight bicycle touring
Wellington Cycling - New Zealand
Mountain biking in Wellington NZ
Waimakariri Eastern Cycle Trails
Bike calculations
Bike1 - HP15c ProgramsDM15c Scientific Calculator
Bike Calculator
eBike Motor Simulator
Click the photos below to enlarge. Use the browser "back control" to return.
 Vista, 5 Level LED Console
 Vista, Protected Pedelec System
 Vista, Double Chain-Guard